Database
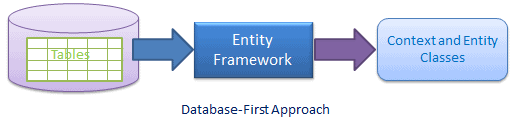
First development with Entity Framework:
We
have seen this approach in Create
Entity Data Model where
we created the EDM, context and entity classes from an existing
database. So, when you generate EDMX from an existing database then
it is a Database First approach.
Entity
Data Model can be updated whenever database schema changes. Also,
database-first approach supports stored procedure, view, etc.
The
Database First Approach provides an alternative to the Code First and
Model First approaches to the Entity Data Model and it creates model
codes (classes, properties, DbContext etc.) from the database in the
project and those classes become the link between the database and
controller.
In
Databse first approach it contains .edmx diagram which have
all model that associated to database.
What is Code-First?:
Entity
Framework introduced Code-First approach from Entity Framework 4.1.
Code-First is mainly useful in Domain
Driven Design.
With the Code-First approach, you can focus on the domain design and
start creating classes as per your domain requirement rather than
design your database first and then create the classes which match
your database design. Code-First APIs will create the database on the
fly based on your entity classes and configuration.
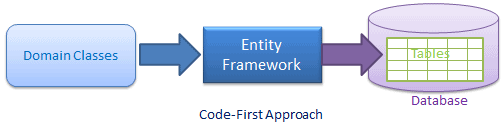
As
a developer, you first start by writing C# or VB.net classes and
context class. When you run the application, Code First APIs will
create the new database (if it does not exist yet) and map your
classes with the database using default code-first conventions. You
can also configure your domain classes to override default
conventions to map with database tables using Data Annotation
attributes or fluent API.
The
basic work flow would be:
Write
application domain classes and context class→ configure domain
classes for additional mapping requirements → Hit F5 to run the
application → Code First API creates new database or map existing
database with domain classes → Seed default/test data into the
database → Finally launches the application
Setup Development Environment for EF Code-First:
Let's
setup the development environment for Code-First before starting on
it.
Install
the following tools to work with Entity Framework Code-First:
- .NET Framework 4.5
- Visual Studio 2012
- MS SQL Server 2008/2012 Express
Creating a Code-First Model from a Database in Entity Framework:
Step 1: Create model.
First,
right click on the folder where you want your model to go, select Add
-> New Item, then select ADO.NET Entity Data Model.

Click
Add,
and select "Code First from Database", then click Next.

On
this next screen, pick your connection information and name the
connection string, then click Next.

On
this last screen, you can now pick which entities you want to include
in your model:

IMPORTANT:
Note that Code-First does not currently support adding Stored
Procedures as entities. You will instead need to call the sproc
manually,
To
build your model, click Finish.
The model generated should look something like this:

Notice
that there's no EDMX file, only CS files. This is, of course, the
definition of Code-First: you only work with code files.
After
create model then context .cs file is created that contain one
constructor and all list of DbSet<table>{
public ApplicationContext()
:
base("ConnectionStringName")
{
Database.SetInitializer<ApplicationContext>(null);
}
DbSet<TableName> name_of_table {get;set;}
}
c Step 2: Enable Migrations
The
next step is to enable migrations. You can do this by running the
Enable-Migrations
command
in Package Manager Console.
This
command will create a folder in your solution called Migrations, and
put a single class inside it called Configuration. The Configuration
class is where you configure migrations for your application.
Step 3: Add an initial migration
Once
migrations have been created and applied to the local database you
may also want to apply these changes to other databases. For example,
your local database may be a test database and you may ultimately
want to also apply the changes to a production database and/or other
developers test databases. There are two options for this step and
the one you should pick depends whether or not the schema of any
other databases is empty or currently matches the schema of the local
database.
- Option One: Use existing schema as starting point. You should use this approach when other databases that migrations will be applied to in the future will have the same schema as your local database currently has. For example, you might use this if your local test database currently matches v1 of your production database and you will later apply these migrations to update your production database to v2.
- Option Two: Use empty database as starting point. You should use this approach when other databases that migrations will be applied to in the future are empty (or do not exist yet). For example, you might use this if you started developing your application using a test database but without using migrations and you will later want to create a production database from scratch.
Option One: Use existing schema as a starting point
Code
First Migrations uses a snapshot of the model stored in the most
recent migration to detect changes to the model (you can find
detailed information about this in Code
First Migrations in Team Environments).
Since we are going to assume that databases already have the schema
of the current model, we will generate an empty (no-op) migration
that has the current model as a snapshot.
- Run the Add-Migration InitialCreate –IgnoreChanges command in Package Manager Console. This creates an empty migration with the current model as a snapshot.
- Run the Update-Database command in Package Manager Console. This will apply the InitialCreate migration to the database. Since the actual migration doesn’t contain any changes, it will simply add a row to the __MigrationsHistory table indicating that this migration has already been applied.
Option Two: Use empty database as a starting point
In
this
scenario we need Migrations to be able to create the entire database
from scratch – including the tables that are already present in our
local database. We’re going to generate an InitialCreate migration
that includes logic to create the existing schema. We’ll then make
our existing database look like this migration has already been
applied.
- Run the Add-Migration InitialCreate command in Package Manager Console. This creates a migration to create the existing schema.
- Comment out all code in the Up method of the newly created migration. This will allow us to ‘apply’ the migration to the local database without trying to recreate all the tables etc. that already exist.
- Run the Update-Database command in Package Manager Console. This will apply the InitialCreate migration to the database. Since the actual migration doesn’t contain any changes (because we temporarily commented them out), it will simply add a row to the __MigrationsHistory table indicating that this migration has already been applied.
- Un-comment the code in the Up method. This means that when this migration is applied to future databases, the schema that already existed in the local database will be created by migrations.
Step 4: For updating table structure or rename column
- If we want to change schema then just go model and update it
- After updating model go to the package manager console.
- Hit the Add-Migration 'MigrationScriptName' command and press enter button.
- Then one migration script is generated in Migration folder
- In this migration script have two method UP and Down.
- In Up method that contain modification change in model as compare to database.
- After we need to hit Update-Database that actually update the data base.
Thanks for reading this article. If you have any queries and suggestion please feel free to ask me and also your valuable comments are important for me which motivates me for writing articles.
0 comments:
Post a Comment